I run a cricket farm and know that keeping crickets alive can be a hard task if you’re not quite sure what you’re doing.
My guess is that you found this post because you own a bearded dragon, leopard gecko, other type of lizard or some kind of reptile, right?
Live crickets are great to feed your reptile as they contain a lot of protein, calcium and other nutrients which are important for your pet. By the way, live crickets can also be a great fishing bait!
However, it can be a challenge to keep your crickets alive until the time comes to feed them to your pet or use as fishing bait.
To keep crickets in captivity alive as long as possible you will need to:
- Keep temperature 80-90°F (27-32°C)
- Keep proper humidity and ventilation
- Maintain clean crickets’ container
- Provide nutritious food
- Ensure constant water supply
In my farm I keep 200 containers (size: 19 gallon / 70 liters) with live crickets. I understand that commercial farming is different from keeping at home one container with crickets.
Though, I have started only with one container and went through same struggles as you. It took me a lot of time to create a proper environment for the crickets to thrive.
Through my crickets-raising journey I learned a lot, so I’m sharing my tips & tricks which may help you to extend the lifespan of your crickets!
Healthy Environment
One of the essential things to keep your crickets alive as long as possible is the environment. To ensure good living environment for the crickets, you have to consider the container (where crickets are kept), temperature, humidity and ventilation. Let’s through them go one-by-one.
Container for Your Crickets
In nature crickets live usually one-by-one and not in tribes. Of course, grass lands there are many crickets, so they meet accidentally or on purpose, for example, for mating reasons. Despite, when crickets are kept in captivity, this looks much different.
Container Size
If you’re not sure what kind of size container you should choose, always choose as big as possible – there will never be too much space for crickets, but there can be too little (which may affect how long your crickets will live).
I understand, if you are keeping (or planning to keep) crickets at home, you want to use as small container as possible to save space. So, the size of container solely depends on how many crickets you‘re planning to keep.
From my experience, this is what container sizes you should consider for your crickets to live comfortably:
| Crickets’ Count | Size (inches) | Gallons | Size (cm) | Liters |
| 50 | 8” x 13” x 9” | 4 gallons | 20 x 33 x 23 | 14 liters |
| 250 | 13” x 14” x 12” | 9 gallons | 33 x 35 x 30 | 35 liters |
| 1000 | 22” x 15” x 16” | 17 gallons | 57 x 39 x 42 | 65 liters |
Disclaimer: in those containers you have to add sufficient amount of egg trays for crickets to have enough living space!
Worth mentioning, that this table is very approximate container sizes and crickets’ ratio. There are more details coming into picture when planning how much space crickets need to live.
Very important part is how much living area crickets have.
Container’s Living Area
Crickets need their personal space. For this reason, you need to create as much surface area for your crickets in the container as possible.
Simply speaking, if you want to exploit the containers volume, you need to use egg trays.
Let’s do some math.
Whatever container you choose, at the beginning, if you will not add extra items in the container, it will mean that your crickets will be able to walk only on the floor of the container. That is not optimal usage of the container’s volume.
If you didn’t know by know, container for your crickets should be made of a proper material, so that crickets won’t be able to crawl container’s walls to the top. If you don’t know much about crickets’ container requirements, check out my other post about how to breed crickets. There you will find a section what kind of container you should use.
You could actually simply increase the surface area for crickets by adding more paper egg trays. Egg trays have two main purposes for crickets:
- Increases living surface for crickets
- Works as a shelter for crickets (for hiding)
REMEMBER: you must use only paper egg trays!
If you will use plastic trays, crickets will be able to eat that. I am certain you do not want to feed your crickets to your reptiles if cricket’s gut is loaded with plastic. Crickets will also eat paper egg trays, but paper will not be bad for your crickets’ guts.
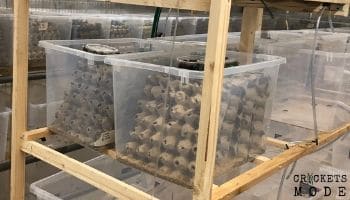
In my farm I use 6×5 paper egg trays and vertically stack 8-10 of them in one 17 gallons (65 liters) container. It means that my crickets can hang out not only on the floor of the container, but chill on the egg trays as well.
It means that by adding paper egg trays, I maximize living area surface in the container. Also, this allows me to grow ~2000 crickets in 17 gallons (65 liters) container. This is how my containers looks.

Of course, it doesn’t mean you need to do the same if you grow only 50 crickets in your container. Add few smaller egg trays with a couple of toilet paper rolls and that should be enough to keep your crickets alive longer (in terms of living area surface).
Ventilation for Crickets
Crickets are living beings. Oxygen is crucial to them same as to us, humans. If you want to keep your crickets alive as long as possible your have to make sure a proper air flow in your crickets’ container.
Male crickets are making noise, when they are mature. So, it could be that you keep your crickets somewhere at the end of the house in a closed room where there’s little or no ventilation. Also, most probably you have a lid on your crickets’ container.
In such circumstances it’s very important to keep as much air flow inside the container as possible.
There are 3 main ways to make sure a sufficient ventilation for the crickets without too much effort:
- Use mesh lid instead of a plastic lid. Mesh itself is full of small holes, which will help for used air in the container mix with fresh air from outside the container. Though, it will require a little bit of setup from your side, because you want to make sure that the sides of the mesh are properly applied to the top of container walls (i.e. a frame for the mesh to hang on). In other words, there must be no cracks, so crickets won’t find a chance to escape your container.
- Use plastic lid, but cut big enough holes (8” x 8” / 20 x 20 cm). Big holes on the lid will assure sufficient airflow. However, the problem can be that crickets will jump out through big holes. What you could do it cover those holes with the mesh as well (like creating small windows). It may be an easier option for you, because by making holes on the lid, you will still be able to use the same lid to and on top of the container. So, the corners of the lid will touch the top of the container’s walls and there will be no cracks.
- Use high enough container & no lid. The purpose of the lid is only to make sure that crickets won’t escape. By using container with high walls, you will be sure that crickets won’t be able to escape. The main advantage is that a lid will not be needed at all. In my farm I actually don’t use lids. Previously I used containers with low walls (16” / 42 cm) and vertically added 6 x 5 egg containers (as in the photo above). So, after crickets crawled to the top of vertical egg tray, it was only about 6” / 15 cm to reach the top of the container. Hence, many crickets escaped because I had no lids. Now I use containers with 20” / 50 cm height walls and none of my crickets escape.
Clean Container Regularly
Poor sanitary conditions in crickets’ container can result in the increase of crickets’ death rate. So, you should maintain clean environment for them to keep crickets alive longer.
To minimize the chances for crickets dying too early, you should clean your crickets’ container at least 1-2 times per month.
If you’re already keeping crickets, you probably noticed how much mess they can make, if you grow them in bigger quantities. This is what you can find at the bottom of crickets’ container after a month of not cleaning it:
- Mold. If you already keep crickets, I assume you feed them with various veggies and fruits. Sure, crickets love that, but what happens with such food Is that it rots fast. Remember, the temperature should be around 80-90°F (27-32°C) for crickets to have good living conditions. In such warmth any organic item will rot fast. For example, give a watermelon for your crickets and after 2+ days for sure you will start to feel the smell. Below I will mention more about the food, but for now just bear in mind: any watery foods will rot fast and mold will start to form which may eventually kill your crickets.
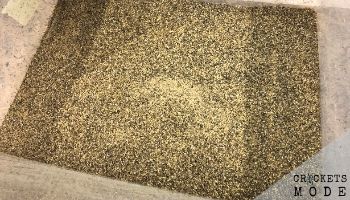
- Cricket droppings (poop). Crickets do poop a lot! In my cricket farm every growing cycle I collect dozens of pounds/kilograms of cricket poop. This is an organic waste, which contains microbes. So, if you don’t clean the container regularly, you crickets will eat, walk and live in an environment full of droppings, which is not very hygienic. Also, if there’s a mold already formed from the food leftovers and humidity is above 50%, then crickets’ poop will start to smell really bad. So, you should clean it regularly. If you’re interested to know where you could use cricket poop, check out my article here.
Here’s how cricket’s poop looks like:

- Dead crickets. Some crickets will die even under perfect environmental conditions. That is inevitable. However, you shouldn’t worry about 1-2 dead crickets out of 50. In any case, you should remove dead crickets from the container as soon as possible. By doing so, you will decrease the chances for live crickets to catch any bad microbes which can result in various cricket deceases.
How To Clean Crickets’ Container?
Cleaning container with crickets is fairly easy. This is how you need to do it:
- Prepare empty clean container (will be used as a new home for crickets).
- Add new paper egg trays in the new container.
- Put food and water supply in the new container.
- Take out all materials (food, water, egg trays) from the old container with crickets. At this point only crickets should be left on container’s floor.
- Add new paper egg tray on the bottom of the old cricket container. By doing so, crickets will crawl on the egg tray to hide.
- Slowly take egg tray with crawled crickets and gently add it in the new (already prepared) container. Now just repeat the process few times until all crickets are transferred into new container.
To clean the old container, simply pour what is left out what is left at he bottom and wash the container with hot water. Don‘t use any chemicals for cleaning, because crickets can be sensitive to it! Some people use bleach, so if really necessary, you can add a little bit of bleach when cleaning, but make sure to clean with water properly afterwards.
However, my recommendation is to clean container with only very hot or boiling water.
Nutritious Food
As you keep (or planning to keep) crickets in captivity, you should make sure that they have sufficient nutrients. If you will feed crickets with food which has very little nutrients, crickets will die faster. For example, if you will feed your crickets with lettuce only, you may notice crickets dying too fast. Lettuce doesn’t have a lot of vitamins required for an organism to maintain good metabolism, so you should consider giving your crickets bigger variety of veggies, fruits and grain culture food.
By the way, crickets are omnivores, which means that they will eat (or will try to eat) basically anything. In nature, crickets survive by eating grass, leaves, plants’ roots. They can even eat meat!
These are few examples what you could and should feed your crickets:
- Carrots
- Bananas
- Oranges
- Watermelons
- Bread
- Cereal
- Special cricket food
Depending on what type of food you provide to crickets, you may need to consider to add extra water supply. If you continuously give your crickets carrots, oranges and watermelons, then crickets get their water needs through the food. Meaning, you don’t need to add extra water supply, because crickets won’t be thirsty.
Advantage of giving crickets watery food is that you don’t need to take care of water drinker. However, the disadvantage of watery food is that it rots fast. It will create mold. As already mentioned, it can increase chances of spreading various microbes (and poor sanitary conditions) which you want to avoid as much as possible.
If you feed your crickets with only grain culture food (bread, cereal and similar), then you must make sure that crickets have water supply at all times.
Water Drinker for Crickets
Depending on the food which you give to crickets, water can significantly increase crickets’ lifespan.
There are few ways how you can provide water to crickets. The easiest way for you is probably so called “water crystals”. They absorb significant water quantities and look as gel. You simply put those watery gels on a small plate for crickets to reach and for a day or two (depending how many crickets your keep) your crickets will have enough water supply.
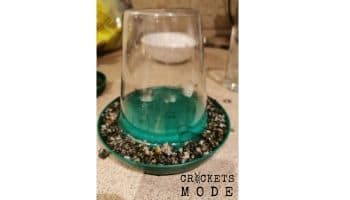
Also, people use chicken drinkers and adapt them to crickets. This is how it looks.

Some time back I tested such drinker on my crickets. This is my opinion about it.
The advantage of a chicken drinker is that crickets will have sufficient water supply for weeks, because water tank is quite big (you can find various sizes on the market). So, it’s quite convenient.
The main disadvantage why I don’t like to use them (at least on my commercial farm) is because water is standing still for weeks in that water tank. After a week, water will get really stinky. Also, crickets will poop in the water which they will later drink. I didn’t do any laboratory tests on such “poopy” water, but I’m quite sure it’s not healthy for crickets in the long run.
Moreover, if you keep baby crickets which hatched from the eggs recently, this water drinker also doesn’t work well, because baby crickets can drown in a single water drop (yeah, they are not good swimmers). I tried to make a workaround and add small rubble, so small crickets won’t drown (as you can see in the image above). It helped, but many baby crickets were still drowning. Also, cleaning such water drinker is a pain.
Hence, I suggest you stick with “water crystals”.
Crickets Are Cannibals
Yes, crickets can eat other crickets. Crickets can become cannibals in captivity if their environment is not properly setup. From my experience, there are few reasons when crickets can become cannibals (meaning, your crickets will live shorter):
- Not enough living area. It is very possible, that there’s not enough living surface for your crickets. If there are too many crickets in the same area, they can start to cannibalize each other. You can simply increase living area by adding more paper egg trays to the container (already explained than above). Or use bigger container.
- Not nutritious food. If temperature is sufficient for crickets, their metabolism happens fast. It means that if you will feed your crickets with food which is not nutritious enough, they will start to eat each other. Crickets are nutritious. So they will get the vitamins they need by eating other crickets (if they will not receive nutrients through the food you give them).
- Different cricket sizes in same cricket container. If it happens that you keep small baby crickets and big mature crickets in the same container, most probably mature crickets will eat smaller crickets. So, you should always keep baby crickets from mature crickets separately.
Why Are Crickets Cannibals? In short, during crickets’ life cycle they go through so called incomplete metamorphosis. It means that baby crickets and mature crickets share same food source. Hence, they can eat each other. You can learn more about what is an incomplete metamorphosis by checking my other post about crickets’ life cycle.
