
I have quite a bit of experience how to breed House Crickets (Acheta Domesticus) as I own my own cricket farm. In this post you will find useful tips & tricks how to keep live crickets.
Cricket breeding is not hard nor requires a lot of equipment, but you will need some knowledge and preparation before you will be able to breed crickets the right way. It‘s a living being, so you should take care of your crickets.
Most probably you’re interested how to breed crickets, because you own a bearded dragon, leopard gecko or other lizard which love live crickets.
TIP: I’ve made a post about 5 reasons why you should breed your own crickets. If you’re interested, give it a read as well.
1. Start Breeding Crickets at Home: Preparation
Probably the first natural question comes in mind: where do I keep live crickets?
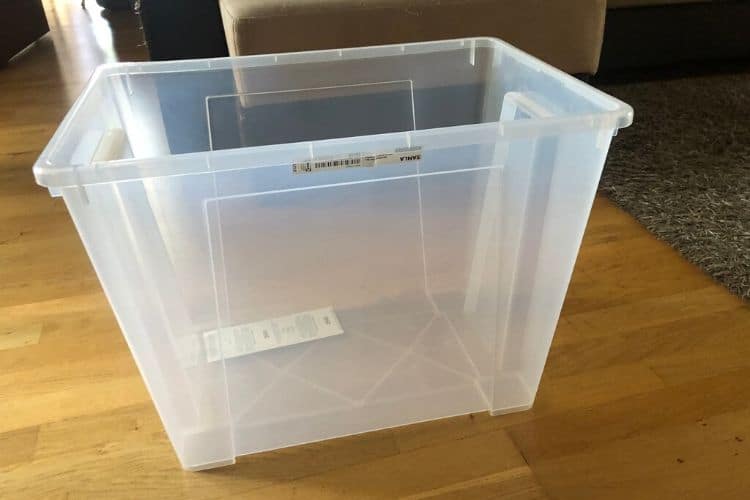
Cricket Box
Well, you will need a cricket container. There are few basic requirements to consider. In most of the cases you could breed crickets in a lizard tank as it will pass the bellow requirements for the cricket breeding container.
- Crickets container needs to be without cracks as baby crickets (aka pinheads) will easily escape. If you will breed crickets at home, I’m sure you don’t want any of them to escape from the container.
- Cricket container must be high enough or have a lid. Crickets can jump high comparing to their size. So, if you will use a container without a lid, the container must be at least 19-inch (50cm) height. Hence, I recommend using a tank with a lid.
TIP: when I started raising my first crickets’ batch in my farm, the containers were too low. After crickets matured and were ready to mate, they were all over the place! It was a nightmare to catch them all. Well, lesson learnt. Now I use containers which are at least 19-inch (50 cm) height.
- If you will use cricket container with a lid, then you can use much lower container than 19-inch (50cm).
- Cricket container lid must have ventilation. What you can simply do is just make some small holes in the lid to keep proper airflow for your crickets.
- Cricket container must be made from slippery material. Plastic or glass will work just fine. Crickets tend to climb as high as possible (it’s their instinct). Other reason is that the higher they climb, the warmer it is (simple physics). Crickets love warmth, so they will try to find the warmest spot to be in.
- Container size is also a factor. You should use at least 4 gallons (15 liters tank). In such container you could easily fit 50-80 live mature crickets.
When I started my farm, I used 17 gallons (65 liters) containers. If setup optimally, you could grow there up to 2500 house crickets. Though, these volumes are for commercial farm.
In short, if your container would be made of thick paper/carton box, then crickets will climb on the walls. Even if you will have the lid, you will have to open it once is while to add food/water, so when you will open the lid, there’s a big chance that some crickets will get out. Hence, always use plastic or glass container to keep your crickets.
Good Environment For Your Crickets
Climate is kind of the most important thing for crickets. Below I listed the most important factors for crickets to stay alive.
Temperature for Crickets
I recommend keeping crickets at 82°F (28°C). Science backs me up on this one. You can read a short abstract here from Journal of Insect Physiology article. There is stated that crickets raised at 77°F (25°C) grew slower and took longer to develop than crickets raised at 82°F (28°C).
Though, during the study it was noticed that crickets raised at 77°F (25°C) obtained great adult body mass than in 82°F (28°C) degrees. Meaning, if you want your crickets to grow faster, simply grow them at least in 82°F (28°C) degrees.
In my farm I try to keep temperature at 86°F (30°C) at all times. I’ve noticed that at higher temperature crickets are much more active, which I don’t mind. Also, due to slightly higher temperature I shorten their maturity time to be optimal (saving time is important when you raise crickets commercially).
When you grow crickets for your bearded dragon, leopard gecko or other lizard, I assume you also want to raise your crickets as fast as possible. So, keep temperature at 82°F (28°C) and your crickets will be happy.
Crickets love dark and nighttime, so it wouldn’t be a good idea to use lamp heaters to maintain sufficient temperature in the container.
Hence, if your room’s temperature is around 77°F (25°C) you shouldn’t bother increasing the temperature with equipment. Crickets will feel just fine. Just make sure the temperature doesn’t drop below 68°F (20°C).
Humidity for Crickets
Humidity plays an important role when raising crickets because it may impact decease and microbes spreading.
Perfect humidity for your crickets to be healthy is 40-50%. Such humidity will allow crickets’ environment to be dry which will prevent microbes from spreading.
Also, low humidity and dry environment prevents bad smell.
My farm has over 100 thousand crickets, the volume is relatively big. When I come in the farm there’s no specific or “bad” smell. This is a good indicator that the environment is clean and dry.
If humidity is higher than that it will not kill your crickets, but in long term it’s not good for your crickets.
To keep crickets in healthy condition, you can get humidity tracker with integrated thermometer which will help you to track if your crickets’ environment is the 40-50% humidity range and appropriate temperature level.
Air Ventilation for Crickets
All living creatures require oxygen. Crickets are no exception. Hence, a proper air ventilation for crickets is important as well.
The advantage of using a container with high walls (at least 19-inch (50 cm) height) is that then you will not need to use a lid. Hence, you will not need to worry about proper air ventilation.
Though, if you will use lower container, then you should make sure that there’s a proper lid. Air ventilation holes should be big enough to have sufficient airflow, but not too big which may result in crickets escaping your container. For starters, you could try out this cricket container on Amazon.
2. Equipment Inside Crickets’ Container
Crickets don’t require much equipment if you grow low quantities with few containers. There are only a couple of items you will need.
Vermiculite for Crickets
By putting crickets in a container, you basically create their own small world where they stay all their life. It means it could get messy.
Most probably you will feed your crickets with some organic food. It means that rotting processes will happen in your crickets’ container even if you clean it often. Also, bad smell may appear as well. Oh yes, bacteria also plays a role here.
To avoid these problems there’s a good solution called vermiculite.
It’s a natural and high absorbent mineral It will always help to keep cricket container dry and maintain as a safe living environment.
Simply pour it on the container’s ground for about 1 inch and vermiculite will do its work.
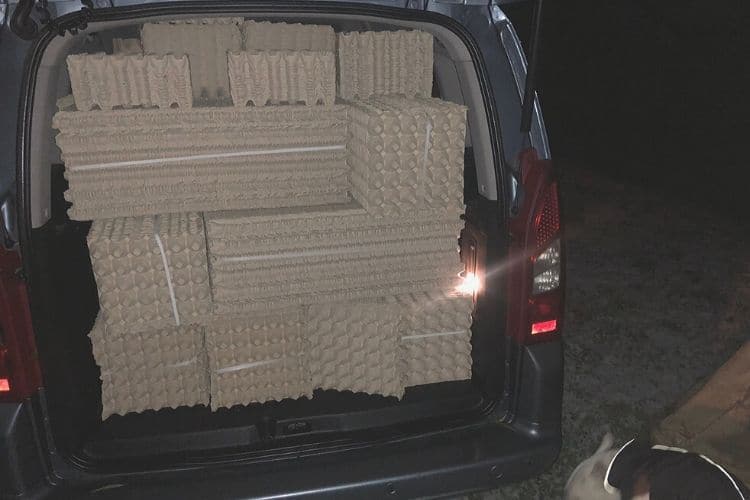
Egg Trays for Crickets
Crickets love to hide.
In the cricket container you should put carton egg trays on the ground. Also, you could use paper roll carton cylinder – it will work just fine.
NOTE: the more carton egg trays or paper roll cylinders you will put, the more living surface area crickets will have. More surface area = more crickets can live comfortably in same container.
Egg trays serve more than just as increased living surface area for crickets.
- Egg trays make crickets feel secure. Crickets don’t hang out in open spaces. If they feel any danger they instantly try to hide and be unreachable. Egg trays serve crickets as a security shelter.
- Egg trays help crickets to increase their personal space. Actually, crickets are territorial insects. They prefer to live separated (i.e. not in colonies).
- Egg trays help to transport crickets. Sometimes there’s a need to put crickets from one bin to another (e.g. for container cleaning purposes). Crickets usually hang out on the egg trays, so you simply need to pick up the egg tray and put it into another bin.
DISCLAIMER: always use only cardboard egg trays. Crickets will eat, so you want to make sure that you don’t put plastic egg tray in a cricket container.
Just for fun – have you every seen 1000 egg trays in a car? These are the volumes of egg trays I have to take care from time to time 🙂
Food and Water
Crickets will eat anything what you will put in their living container.
In another post I’ve listed what do crickets eat in different environment (nature, captivity or in commercial farms).
In short, as you will breed your own crickets at home, you can give your crickets this food to keep their good health:
- Oranges
- Apples
- Bananas
- Watermelons
- Lettuce
- Bread
- Carrots
- Cereal
You should circulate the food variety from time to time for your crickets to be able to get various nutrients.
Also, depending on what food crickets are given, they may need or not need separate water supply. For example, if you feed your crickets with watermelons, apples, oranges, then crickets won’t require water.
Though, if you will feed crickets with bread and cereal, then you need to make sure that small water tank is always available to crickets. I will make another post soon about how you should make a cricket drinker tank.
Live Crickets
After you’ve done the steps mentioned above and your setup is ready to raise your own crickets, the last step you need to do is buy your batch of live crickets online.
Depending on your capacity and needs (i.e. how many crickets you are prepared to keep) you should choose how many crickets you want to raise. You can start your cricket farm with as low as 20-30 mature crickets. You can easily buy live crickets on Amazon. There should around 50/50 females and males split.
Keep in mind, crickets breed exponentially. After the first breed cycle, your cricket tribe will increase 5-10 times!
When you get your live crickets, simply release them to your setup cricket tank and just let them settle for few days in their new home.
3. Let’s Breed Crickets the Right Way: Equipment With Steps
Crickets breed when they are fully mature (start chirping). Same as cricket keeping setup doesn’t require too much of equipment, same is with cricket breeding kit.
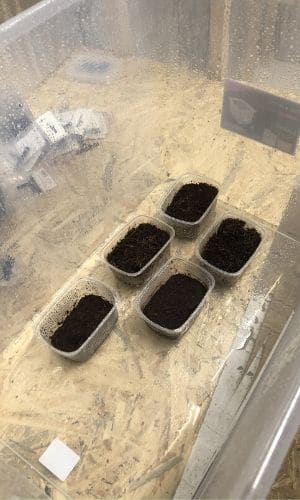
Small Container
You will need a container where you will put the specific soil where crickets actually will put the eggs in.
For this container you can use a plastic yogurt cup or cut the bottom of a plastic milk jar which will look more like a small bowl. Container’s wall should be around 2.5 inches (6 cm).
TIP: scrub the outside part of the container with a sandpaper. It will help your crickets to crawl in the container.
For crickets to easier get inside the container you could scrub with a sandpaper or put some carton bridge for them to get on the soil easier.
Coconut Soil
Tropic Terrarium Substrate called coconut soil is what you need for your crickets to lay eggs in.
This soil is natural and organic. It is usually used in terrariums for spiders or reptiles as a bottom surface material. This coconut soil has two main benefits:
- it sustains moisture
- it doesn’t mold
If you‘d use other soild material, mold may become a problem, because you will keep this soild moist for around 2 weeks.
What you need to do is take a bit of the soil and boil it water for 5 mins. It will kill all bacteria inside. Now leave it to cool and put this moist soil in the small container which you prepared in advance. You should put around 1 inch of the soil in it.
Put the container with soil in your crickets container and leave it there for few days. So, what‘s next you ask?
How Long Do Crickets Breed?
Depending on your capacity of raising crickets and your needs (how many crickets you want to keep), you should decide how many days you should allow your crickets to breed (i.e. how many days keep the soil in crickets container).
Calculation: How many crickets Do I need
Disclaimer: You should be careful with breeding, because crickets breed exponentially!
A female cricket lays 5-10 eggs per day. In total female may lay around 100 eggs in her lifetime.
it doesn’t mean that a female will lay 10-20 days from the day they are mature. This number should be taken as an average to get the idea what capacity females have and how many baby-crickets you should expect.
Let’s say you have 20 mature crickets in your newly setup container. Great, now we can assume that 10 of them will be females. It means that within 5 days of 10 females working on laying eggs (10 per day max) we can expect to get 500 eggs.
Well, that’s in theory. From my experience, what will happen is that the actual cricket hatch rate will be lower. These are the things which may affect lower cricket eggs hatch rate:
- Some females will day before they lay the eggs
- Some females may be less prolific (less or no laid eggs)
- Some eggs will not hatch even in perfect condition
- Some eggs will die
- Some eggs will be eaten by male crickets
So, there are bunch of reasons which may affect baby crickets hatch rate to decrease.
Overall, from 500 laid eggs we could expect 250 to actually hatch. Those will be the ones which will continue your cricket generation.
Do you see the trend here? You started with 20 crickets and after first breeding cycle you have now 250!
If you have a fully grown breaded dragon, it will eat ~70-100 crickets per month. It means that you are covered with crickets for your lizard for at least 2 months.
How Do Cricket Eggs Look Like
Cricket Eggs are long white small grains. It looks like a grain of rice.
After the first day you put coconut soil for crickets to add eggs, you may not notice any eggs. After a day or two if you will move some soil around you should see a bunch of white small eggs within the soil.
Also, if you will not notice any eggs in the soil, but you will see crickets walking on the soil and females lowering their back to the ground, it means that crickets are laying eggs.
Here’s how it looks in action.
Crickets incubation: Eggs Hatching
After you took coconut soil from crickets‘ container, you will have to put in another container (it can be any plastic/glass container). You should cover it with a lid to maintain low evaporation.
Crickets‘ eggs will hatch is 11 days under optimal conditions.
What is optimal in this case? It means that you have to keep 90°F (32°C) temperature if you will want for the eggs to hatch in 1 days. Also, the soil with eggs have to say moist. By keeping 90°F (32°C) water from the soil will evaporate fast, so you will need to spray some water on the soil twice per day.
NOTE: it‘s important not spray too much the soil, because eggs with drown if there will be water pond at the bottom. Basically, keep the soil wet, but don‘t allow for water ponds to form.
If you will have no heater to keep 90°F (32°C) temperature for the eggs, you can simply put the eggs under the heating lamp to assure proper temperature.
Alternatively, if you‘re not in the rush, you can keep soil‘d temperature 81°F (27°C) and eggs will still hatch. Though, keep in mind that it will extend hatching cycle significantly. You may need to wait for even up to a month. But don‘t worry, if you will be patient, it will be alright and you will see results eventually!
Baby Crickets: Pinheads
Baby crickets are also called pinheads.
After 11 days under optimal incubation conditions, you should start to see small crickets jumping around. You will instantly understand that they are small crickets, because they will jump from the minute it will hatch.
After you start seeing first pinheads, add a wet sponge for pinheads to crawl and drink.
IMPORTANT: pinheads will drown in one water drop! You can to keep pinhead container very clean and without any water drops. Carefully add wet sponge and keep it wet at all times. Once more – everything is dry only the sponge is wet in pinheads container!
leave that container for a day or two where box with soil is added. Within 2 days you will notice even more pinheads hatched. From day 1 you should add a slice of carrot or a lettuce leave for the pinheads to have something to eat.
After two days you should prepare new cricket container (the same size which were you keep your mature crickets) and add there the pinheads. Add egg trays and food same as you did for the mature crickets. Also add the soil in the container as well, because eggs may hatch for few upcoming days. That‘s it!
You should not add pinheads together with mature crickets because the big ones may eat the small ones and we don‘t want that.
At this point you will have two boxes of crickets. The initial box with mature crickets and the new one with pinheads. Maintain both containers appropriately and repeat cricket breeding when needed.